Here’s a post to help me relive my backpacking days. Hopefully there are a few of you out there that will find this useful!
There’s a reason that the Annapurna Circuit is considered to be one of the most beautiful and popular long distance hikes in the world. It passes through such a diverse range of scenery, from lush tropical forest to yellow rice paddies to dense fir and pine forests to desert landscapes that it’s hard to believe you’re even in the same country, let alone the same hike!
Although I had many wonderful recommendations from fellow backpackers to go on this hike, there were a few key pieces of information I wish I would have known before starting the Circuit. For whatever reason, these following bits of information about the hike are almost nowhere to be found when researching information about the Annapurna Circuit on the web.

1. It gets cold. Like, really cold.
I’m not too sure why, but the subject of ‘prepare to freeze your ass off’, never really came up when hearing others talk about their experience on the Annapurna Circuit. I wish it had. Because I left to hike the Circuit in what is considered to be “high season” (October to November), I assumed that I was more than prepared with my light down jacket, -5 degree Celsius sleeping bag, and fleecy pair of long johns. Oh no. Even still, I found myself having to drag myself out of my cozy sleeping bag each morning (once above 3,000 m) to face the unpleasant prospect of a few hours of very chilly hiking as we waited for the sun to come up. The worst was up at High Camp, at an elevation of 4,850 m, where the water used to flush the squat toilets froze solid and the dining room lacked a fireplace. Oh how I had yearned to get over that pass and back down to an elevation at a warmer temperature!

2. Hot showers don’t necessarily mean hot showers. (Just as free wifi may not exactly mean free wifi)
The higher up you go, the harder (and more expensive) it becomes to find what some might consider to be necessities. When the temperatures are cold, cold showers soon become sadistic pleasures meant for those who enjoy the feeling of daggers of ice all over their body. Not my cup of tea. So you decide to splurge for a “hot shower”. Although you soon realize “hot” means nothing more than “slightly better than freezing cold, lukewarm if you’re lucky”. Was that really worth the 100 Rp? Save yourself the frustration and pack some Wet Wipes.

3. This is how much you should really budget per day
The lack of ATMs along the trek make it necessary to withdraw sufficient funds for the complete duration of the Circuit. But how much do you really need? The answers we got to this question varied considerably. We heard anywhere from $10 USD to $40 USD per day being a reasonable amount for budget travelers!
Luckily we withdrew a bit more than the bare minimum recommendation of $10 USD, as we quickly found out that this would barely get us 2 meals a day at the higher elevations!
In our experience, $15 USD per day was the minimum amount to provide us with more of the ‘basic’ items on the menus (nothing fancy, more in the realm of fried potatoes with veggies, the local favorite of dhal bat, and the occasional cup of tea). A more reasonable budget for travelers able to deprive themselves of expensive luxuries such as apple pie, beer and deep fried Mars bars would fall somewhere between $20 to $25 USD.
And if you’ve got money to burn, prepare to spend upwards of $30 USD per day, especially at the higher altitudes where prices quickly double and triple.

4. Watch out for scams by the guesthouse owners.
You may have already heard that the Annapurna Circuit is known as a “teahouse trek”. Meaning that, along the way, you stay at guesthouses where you are also expected to eat dinner and breakfast. This sometimes means that you can stay for free, although the meals are much pricier than what you’re used to.
The guesthouse owner tallies up your bill after breakfast, before you leave for the trek.
“What’s this?” you say. Your macaroni and cheese somehow costs an additional 200 Rp than it did the night before, when you ordered it from the menu. You immediately check the menu. And then the next menu. Much to your surprise, you find that the guesthouse owner has purposefully changed the price of your meal on all of the menus making it ridiculously expensive, for a meal that was already ridiculously expensive.
True story. So please, always double check the prices and write the prices down when ordering your meals to stop this from happening to you!

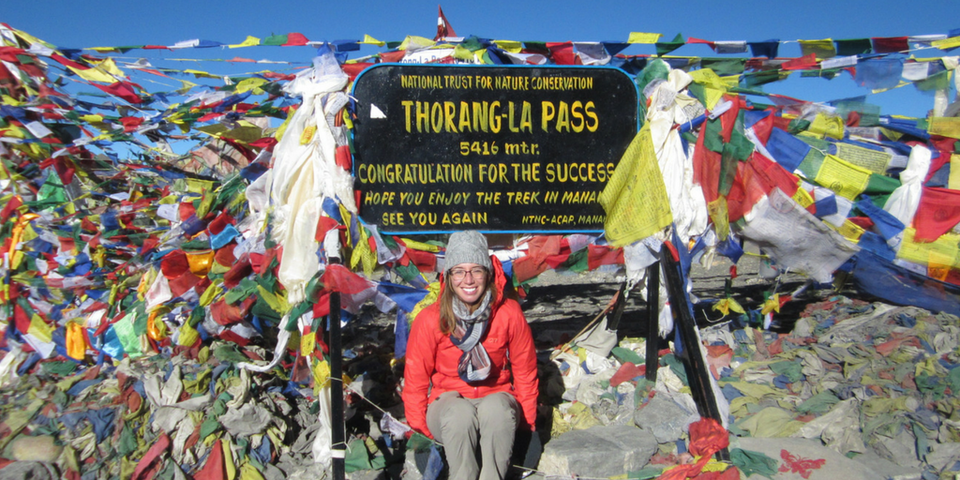
5. You’ll think the worst is over once you cross the Thorong La Pass. It’s not.
Not only do you have a pretty torturous descent in front of you to get to the next village of Muktinath (over 1,400 m of descent, to be exact), but you also have the wind of the Kali Gandaki valley to deal with. My elation at having gotten over what I had considered to be “the hardest part of the trek” quickly faded once I was battling extreme wind going in the opposite direction, along with dusty roads and small pebbles hitting my face.

6. It is worth it to continue your trek after reaching Jomsom.
So you’ve made it to Jomsom. Not only did you get over Thorong La Pass, but you also battled fierce winds and horrible traffic afterwards to make your way to Jomsom (see no. 4). You’re absolutely exhausted, and the prospect of being able to take a Jeep all the way back to Pokhara (or even better if you have the money, fly out from the airport) sounds perfect. To many trekkers, this sounds like a great plan. Keep in mind though, that there are a multitude of side treks and beautiful trails (NATT trails) made specifically to avoid the dusty road and windy valley, and there is so much beautiful scenery to come! You’ll also be able to enjoy much more beautiful scenery without having to share it with loads of other trekkers, like that time you waited in line to take your picture at Thorong La Pass.

7. Learning a few words of Nepali can go a long way
I tried to learn a few words of Nepali at the start of my trek. I really did. Until I heard from other backpackers that “Nepalis don’t really say thank you” and that their way of saying “How are you” really means something like “Are you okay?”.
The Nepali person I explained this to couldn’t have been more surprised!
The minimum is Namaste, he told us (at least that one I knew). But thank you (‘dan-ay bat’) and how are you (‘tapai lai kostosa’) were also very common things to say, contrary to what we had heard!
The one Nepali word that got us the most smiles, however, was ‘mitosa’, meaning ‘tasty’.
Make an effort. The Nepalis are some of the most helpful and friendly people on the planet and will definitely appreciate it!
P.S. Although it might seem like I’m complaining just a tad too much about this hike, it’s more to serve as a word of caution to those thinking of taking on the trek. We did our research as best we could and purchased a guidebook and map before setting out. Even still, the guidebook failed to mention much of what I wrote above.
The better prepared you are for what’s to come, the more likely you’ll enjoy it. There’s a reason its considered to be one of the most beautiful long-distance treks in the world!